pandas_GUI
Pandas_GUI (aka: jupyter_Pandas_GUI)
Introduction | Current Features | Wishlist | Usage | Installation | Change Log | Issues or comments | License | PyPi link
Introduction:
This package provides GUI tools to help the user construct Pandas and Python expressions to create things such as new calculated columns, plots or fits. The tools are meant to run in an interactive Jupyter notebook in classic Jupyter, Jupyter Lab and Google Colab. All tools are based on ipywidgets widgets.
These tools are meant to help the user learn how to construct the commands. They are intended for new or occasional users of Pandas. However, sophisticated users may find them useful for doing simple one-off tasks where the ability to choose python objects from menus can reduce errors.
Current Features:
The user can pass the GUI tools a list of Pandas DataFrames to work with. If nothing is passed, the GUI will look for Pandas DataFrames in the interactive session. In classic Jupyter the whole GUI and the Jupyter cell that created it are deleted when done. This leaves only the code that was generated by the GUI and the results of running the generated code. In Colab and Lab the code is generated in an editable text box. In Lab it can be run by clicking a button. In Colab it is best to copy the code into a new cell before running it.
The generated code contains comments meant to help new users understand the code.
Currently defined GUIs:
new_pandas_column_GUI(): A GUI with four steps to lead the user through formulating an expression for a new column.
plot_pandas_GUI(): A GUI with four steps to lead the user through plotting Pandas data as a scatter or line plot using plotly.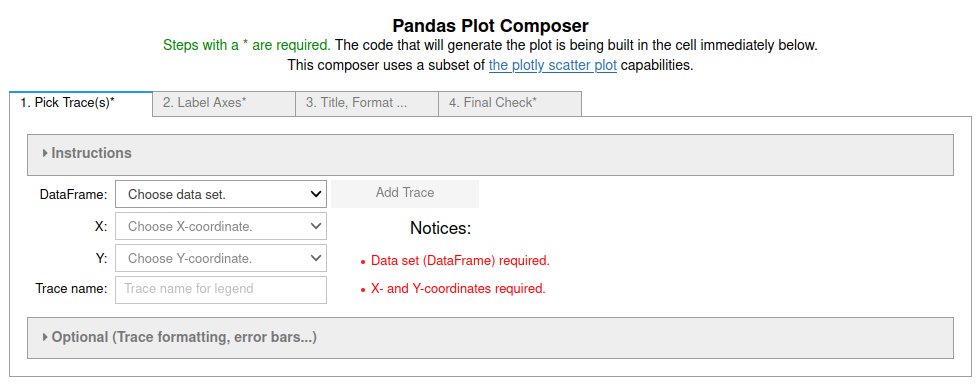
fit_pandas_GUI(): A GUI with six steps to lead the user through fitting Pandas data to a line, polynomial, simple exponential decay, exponential decay from an initial value to final value with an x-offset for the beginning of the decay, Gaussian or sine function. Selecting regions of the data set to fit does NOT currently work in Colab.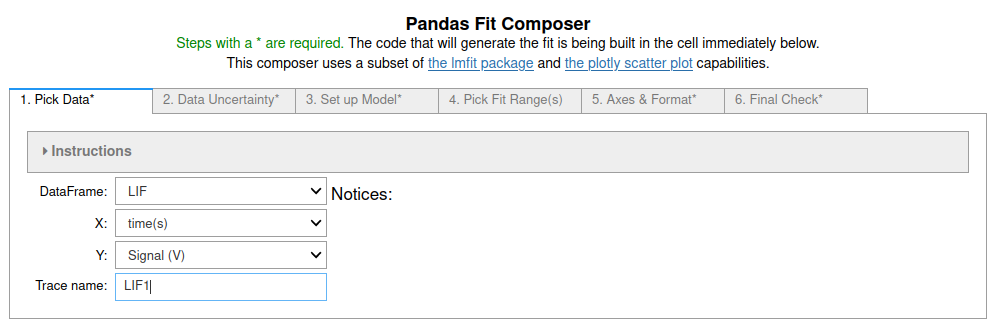
Wishlist:
- GUIs for plots beyond scatter/line plots.
Usage:
If the jupyter_Pandas_GUI is installed in your Jupyter/Python environment
start by importing it:
from pandas_GUI import *
When you want to use a particular GUI issue the appropriate command. Currently:
new_pandas_column_GUI()
or
plot_pandas_GUI()
or
fit_pandas_GUI()
See the documentation for examples, more details and information about passing dataframes that are not at the root of the interactive namespace or presenting the user with alternative names for the dataframes. There is also an option to make columns containing text available. By default they are ignored.
Installation:
Installation using pip into a virtual environment is recommended.
Production
- If not installed, install pipenv:
$ pip3 install --user pipenv, or your favorite environment management system. You may need to add~/.local/binto yourPATHto makepipenvavailable in your command shell. More discussion: The Hitchhiker's Guide to Python. - Navigate to the directory where this package will be installed.
- Start a shell in the environment
$ pipenv shell. Install using pip.
pip install jupyter-Pandas-GUI. This will install Jupyter into the same virtual environment if you do not already have it on your machine. If Jupyter is already installed the virtual environment will use the existing installation. This takes a long time on a Raspberry Pi 3B+ or older. It will not run on a 3B+ without at least 1 GB of swap. See: Build Jupyter on a Pi .- Still within the environment shell test this by starting jupyter
jupyter notebookorJupyter lab. The version of Jupyter requested should launch in your browser.- Open a new notebook using the default (Python 3) kernel.
- In the first cell import the pandas_GUI module:
from pandas_GUI import * - To try:
- Create some Pandas DataFrames in the notebook.
- Use the command
new_pandas_column_GUI()to start the GUI. - It will search for the DataFrames you created.
- Follow the steps to create a new column in one of your DataFrames.
_Optional_ You can make this environment available to an alternate Jupyter install as a special kernel when you are the user.
- Make sure you are running in your virtual environment
$ pipenv shellin the directory for virtual environment will do that. - Issue the command to add this as a kernel to your personal space:
$ python -m ipykernel install --user --name=<name-you-want-for-kernel>. - More information is available in the Jupyter/Ipython documentation. A simple tutorial from Nikolai Jankiev (_Parametric Thoughts_) can be found here.
- Make sure you are running in your virtual environment
Development
Simply replace $ pip install jupyter-Pandas-GUI with $ pip
install -e ../jupyter_Pandas_GUI in the _Production_
instructions.
Change Log
- 0.10.1 (2025-12-23)
- BUG Fix: removed .show in favor of display to avoid clobbering LaTex rendering (issue 24).
- BUG Fix: replaced
1/Yfiterrand1/Yerrwith1.0/...(issue 25). - Set requirements to accept any version of Sympy, as the parsing we intend to use seems good going way back in versions. This way we are less likely to cause problems for other packages. (issue 27)
- 0.10.0 (2025-6-1)
- BUG Fix: fixes to coloring in fitmodel equations.
- NEW Feature: OffsetExp fit (exponential decay from one value to another, with an x-offset for start of decay).
- NEW Feature: Using built in lmfit intial guesses where possible.
- Added
Sympyto requirements to support generating LaTex equations from Python expressions. - Updated dependency versions.
- 0.9.3 (2025-2-17)
- BUG Fix: Plot_GUI having intermittent failure to display the plot.
Wrapping
plotly.FigureWidget.show()indisplay(..)as was done in the Fit_GUI appears to fix.
- BUG Fix: Plot_GUI having intermittent failure to display the plot.
Wrapping
- 0.9.2 (2025-2-13)
- BUG Fix:
plotly.FigureWidget.show()had stopped working in Jupyter with plotly 6.0.0 unless it is on the last line of a cell. Fit_GUI now wraps it indisplay(..)to force display when not on last line.
- BUG Fix:
- 0.9.1 (2025-2-8)
- Added
anywidgetto requirements. Plotly now requires anywidget for FigureWidgets to work in Jupyter.
- Added
- 0.9.0 (2024-3-31)
- NEW Feature: plot and fit GUIs allow controlling aspect ratio and size of figure.
- NEW Feature: default format for plotly download (camera in modebar) is now SVG. If users want a png, they can use a screenshot.
- BUG Fix: colored text in LaTex not rendering properly. Use of backslash for escaping unreliable. Switched to using Python raw strings where possible and more careful use of "{}" to indicate range of LaTex expression to color.
- Improved initial guess for fitting to sine wave using FFT.
- Improved initial guess for fitting a Gaussian.
- Made more robust to running with packages that can use the IPython
preparser to cast Python integers to specialized types (e.g. Sympy &
Algebra_with_Sympy), by wrapping integers with
int()in generated code. Added comments to generated code explaining this. - Removed statements from generated code for NBClassic that did nothing because of asynchronicity of javascript and python.
- Updated allowable versions of packages.
- Documentation updates to reflect changes.
- 0.8.0 (2023-6-21)
- In Jupyter Lab results of running code now replace the GUI rather than appearing in the Console.
- Colab behavior has been inconsistent. To avoid problems for the time being the user is required to copy the code from the textbox it is created in and paste it into an empty code cell to run it.
- BUG FIX: collapsed "code that was run" box in Lab now keeps raw html codes, so when copied and pasted output formatting is maintained.
- Changes to avoid warnings caused by JSON having no representation for floating point infinity and not-a-number.
- Requirements updates to reflect changes in the Jupyter ecosystem.
- Documentation updates to reflect changes.
- 0.7.1 (2022-12-18)
- Documentation fixes and link updates for mybinder.org launches.
- Updates to requirements.
- 0.7.0
- GUIs now also work in Jupyter Lab and Google Colab, although less elegently than in classic Jupyter. Only the fit range selection tab does not yet work in Google Colab.
- Some minor bug fixes and clarification of instructions.
- More and better comments in generated code.
- Replacement of notebook cell javascript tools with those from JPSLUtils is complete.
- 0.6.2.1 Fix for python move of
Iterabletocollections.abc - 0.6.2
- Can now pass dataframes to the GUIs and they will search for additional dataframes in the user namespace. Search can be turned off.
- Fixed edge case where GUI fit range picking did nothing.
- 0.6.1 fixed
fit_pandas_GUI()mishandling of user friendly names for the data frames. - 0.6.0
- Documentation (Examples and API).
- Addition of fitting GUI.
- Minor bug and typo fixes.
- Images show up on Pypi page.
- 0.5.2
- Widget states autosaved when a new plot is made.
- Began making use of JPSLUtils.
- 0.5.1
- Possible to use pandas dataframes in namespaces other than the user global namespace.
- Readme updates.
- 0.5.0 Initial beta release.
Issues or comments
Please submit issues and comments to the Project on Github
JupyterPhysSciLab/jupyter_Pandas_GUI/issues
Known issues
- In Google Colabratory images in point styles buttons do not show up. This is a related to a known issue with Colab. Fix will depend on updates to Colab.
- In Google Colabratory typset rendering of Latex in widgets is hit or miss. It works most of the time in regular outputs and for plots.
This software is distributed under the GNU V3 license
This program is free software: you can redistribute it and/or modify it under the terms of the GNU General Public License as published by the Free Software Foundation, either version 3 of the License, or (at your option) any later version. This program is distributed in the hope that it will be useful, but WITHOUT ANY WARRANTY; without even the implied warranty of MERCHANTABILITY or FITNESS FOR A PARTICULAR PURPOSE. See the GNU General Public License for more details.
Copyright - Jonathan Gutow, 2021 - 2024
Development Notes
General | Make Docs | Build PyPi Package |
General Notes
- Thoughts on GUI for loading data. Could use ipyfilechooser to select local files. A dropdown for html vs csv to filter and select the reader. A checkbox for the index (label) column or not in file. The html loader creates an array of dataframes, one for each table. These should be broken up or the user asked which ones to load.
- Consider making array of code strings for each trace in plot GUI, allowing the user to then delete them from a list and have the plot code updated.
- Consider showing error band, when error bars reach high density.
Constructing the Documentation
- Make sure pdoc is installed and updated in the virtual environment
pip
install -U pdoc
. - The main README combined with Development Notes is used as first page.
- During development you may point to images and so on in the local
directory structure. However, they will have to be changed to absolute
(full url) paths before pushing to the main repository. The root is
https://jupyterphysscilab.github.io/jupyter_Pandas_GUI/DataSetsfor images. - DO NOT change absolute (full url) paths.
- During development you may point to images and so on in the local
directory structure. However, they will have to be changed to absolute
(full url) paths before pushing to the main repository. The root is
- Make edits to the file
Pandas_GUI_Doc_Home.html. - At the root level run pdoc
pdoc --logo Pandas_GUI_Icon.svg --logo-link https://jupyterphysscilab.github.io/jupyter_Pandas_GUI/ --footer-text "jupyter_Pandas_GUI vX.X.X" -html -o docs pandas_GUIwhereX.X.Xis the version number. - Edit the created
index.htmlso that the refresh points toPandas_GUI_Doc_Home.html.
Tasks for Documentation
Building PyPi package
- Make sure to update the version number in setup.py first.
Install updated setuptools and twine in the virtual environment:
pipenv shell
pip install -U build setuptools wheel twine
Build the distribution
python -m build.Test it on
test.pypi.org.- Upload it (you will need an account on test.pypi.org):
python -m twine upload --repository testpypi dist/*. Create a new virtual environment and test install into it:
exit # to get out of the current environment
cd <somewhere>
mkdir <new virtual environment>
cd <new directory>
pipenv shell #creates the new environment and enters it.
pip install -i https://test.pypi.org/..... # copy actual link from the
                                           # repository on test.pypi.
There are often install issues because sometimes only older versions of some of the required packages are available on test.pypi.org. If this is the only problem change the version to end in
rc0for release candidate and try it on the regular pypi.org as described below for releasing on PyPi.- After install test by running a jupyter notebook in the virtual environment.
- Upload it (you will need an account on test.pypi.org):
Releasing on PyPi
Proceed only if testing of the build is successful.
- Double check the version number in setup.py.
- Rebuild the release:
python -m build. - Upload it:
python -m twine upload dist/* - Make sure it works by installing it in a clean virtual environment. This
is the same as on test.pypi.org except without
-i https://test.pypy.... If it does not work, pull the release.
 1"""
 2.. include:: ../README.md
 3.. include:: ../Development Notes.md
 4"""
 5__docformat__ = "numpy"
 6
 7name = "pandas_GUI"
 8
 9import os
10
11# locate directory for this package to use for loading ancillary files.
12# absolute path to directory containing this file.
13mydir = os.path.dirname(__file__)
14
15# load any supporting files
16
17# import the GUI tools
18from pandas_GUI.new_pandas_column_GUI import new_pandas_column_GUI
19from pandas_GUI.plot_Pandas_GUI import plot_pandas_GUI
20from pandas_GUI.fit_Pandas_GUI import fit_pandas_GUI
21import JPSLUtils
22
23# clean up namespace
24del os
25del mydir